Understanding the Android bytecode
About some 4 years ago I had an idea for a project which required a deep understanding of the binary format of Android applications. At the time there were not too many tools for this purpose and the ones which were available were in their infancy. Things have changed since then, today there are a number of interesting projects that help you reverse engineer APKs. I listed a few of the ones I came across at the bottom of this post.
Back then I decided to write a set of tools to help me work with and learn the details of the DEX format. I personally use a combination of Linux and Mac for development so I created a command line and GUI tools for both platforms. Each tool had a slightly different use case I needed to address but they have both helped me quite a lot in the last few years working with Android. The code has been on GitHub for a while, I finally got around to cleaning it up enough for an initial release.

Because of this early day work with the DEX files I ended up getting recruited to lead a project related to security a few years ago. The work was to post process Android APKs analyzing applications and enforcing rules. I realize the vast majority of developers would never need to understand what happens to their Java code once either javac or Jack & Jill processes them. How many people would ever need to crack an APK open, inject code and re-package apps? Probably not too many. It turns out you can learn quite a bit about how ART & Dalvik actually execute your code and help you make better decisions. If nothing else it will satisfy your curiosity by letting you browse the bytecode of any app.
Background
Most of all the information you need for understanding DEX files is neatly documented under ART and Dalvik in the AOSP site. A quick glance at that section will reveal the instructions’ format and the layout of a DEX file. Of course you could also read the ART source code but that would take a lot more energy.
Reviewing the DEX format makes it clear why problems like Building Apps with Over 65K Methods happen. The size of each table in a DEX file has an upper limit which is pre-determined in the spec. So if your app and all the libraries it uses has a combined number of methods or fields greater than 65k you will run into problems. Although the Android docs don’t mention it is possible to run into this problem with any of the internal tables in a DEX file. I ran into this problem with an app that had too many strings defined.
You don’t have to make yourself familiar with every detail of the DEX format and the instruction set to use most reverse engineering tools. There are some instances in which it is useful to know exactly which DEX instruction is being used, for those rare occasions the tools presented here have the option to display DEX instructions in their purest form.
Dedex, DexMac & DexDisassembler
These are three front-ends for the library that handles DEX files. Dedex is a command line tool. DexMac is a Cocoa App and DexDisassembler is a GTK app. All three apps use the Dex.Net library to handle DEX files. If you just want to give them a try, head to the release page of each project on GitHub for the respective binary. All files are statically linked and should run without additional dependencies. The examples in this article are illustrated with DexMac.
Both DexMac and DexDisassembler use the exactly same UI design. You open an APK or DEX file and a list of packages are displayed in a tree. You can expand a package to see classes then methods of a class. One useful feature is the ability to switch between rendering languages. You can see the same Class or Method in any of the supported rendering languages. Dex.Net allows for new languages to be added, I might add a few more renderers in the future. For now only Plain and Enhanced DEX are available. More about them shortly.
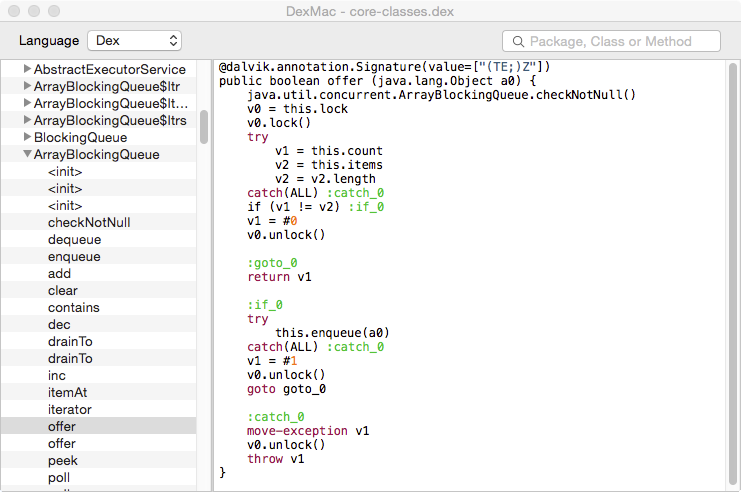 DexMac showing a method using the default Enhanced DEX renderer
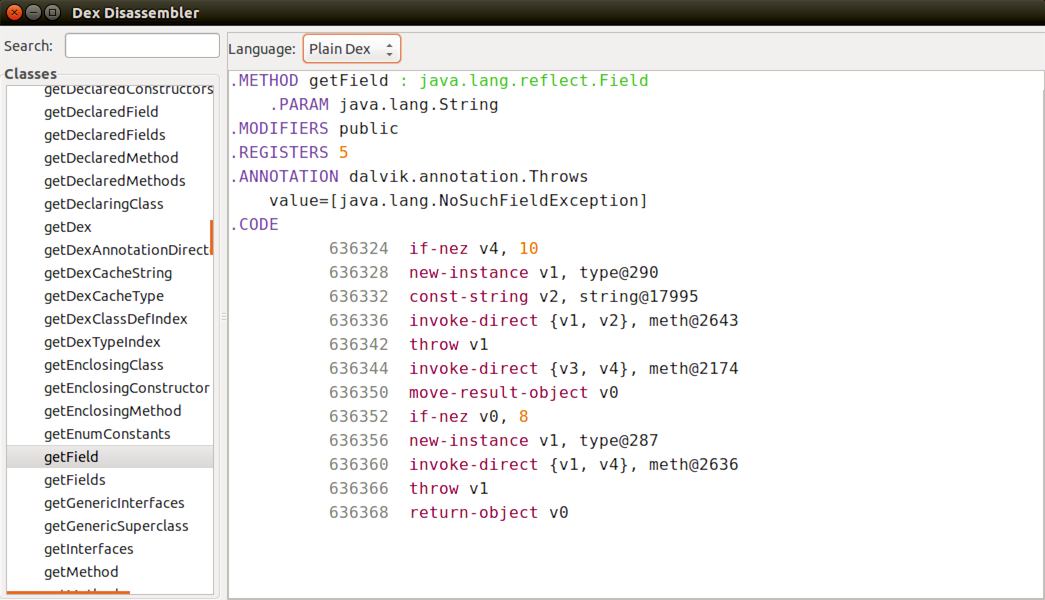 DexDisassembler showing a method using the Plain DEX renderer
Dedex is a simple command line tool. By default it lists all classes in the provided DEX or APK. You can narrow down the classes with a particular name using the ‘-c’ option, e.g. ‘-c org.xmlpull.v1.*’ will process only the classes in that package or subpackages. The ‘-d’ option lets you select the level of detail you want to see for each class, possible values are ‘All’, ‘Classes’, ‘Methods’, ‘Fields’ and ‘OpCodes’. The default is ‘Classes’. You can also save the output of each class to a file instead of displaying them in stdout.
Display Formats
There are currently two ways to render the bytecode of a method, DEX and Plain DEX. They are both what I call a 1:1 renderer, meaning there is no aggregation of instructions. A single DEX instruction will be shown as a single line by both renderers.
So what’s the difference between the two renderers? I will use the following method from java.util.concurrent.ArrayBlockingQueue to illustrate the output from both renderers:
public boolean offer(E e) {
        checkNotNull(e);
        final ReentrantLock lock = this.lock;
        lock.lock();
        try {
            if (count == items.length)
                return false;
            else {
                enqueue(e);
                return true;
            }
        } finally {
            lock.unlock();
        }
    }
If you are unfamiliar with the DEX instructions the examples below you leave you wondering how they relate to the Java code. For now do trust they are logically equivalent. I will introduce the basics of the DEX compilation in this article but will need many other articles to cover the bulk of the compilation.
Plain DEX
This renderer tries to present instructions as close as possible to what is defined in the Summary of bytecode set. The goal here was to present an unmodified bytecode to help with debugging. The only exception is the set of instructions with payloads. The payload is appended the end of the bytecode section in a method and makes sense only for the instruction which uses it. This renderer copies the respective payload section and presents it alongside the instruction that uses it.
Try/Catch blocks are also overlayed. In a DEX file try blocks are stored in a different data structure to not interfere with the main code path. This renderer shows the sections of bytecode that are covered by each try block.
No other pointer or references are resolved. The result is a raw instruction set which is a bit difficult to read. Because of the lack of user friendliness I’ll not use it in the examples in this article. Let me just briefly explain the general format.
.METHOD offer : boolean
	.PARAM java.lang.Object
.MODIFIERS public
.REGISTERS 5
.ANNOTATION dalvik.annotation.Signature
	value=["(TE;)Z"]
.CODE
	     1190288  invoke-static {v4}, meth@12229
	     1190294  iget-object v0, v3 field@4169
	     1190298  invoke-virtual {v0}, meth@14543
	               .TRY #0
	     1190304  iget v1, v3 field@4166
	     1190308  iget-object v2, v3 field@4167
	     1190312  array-length v2, v2
	               .CATCH
		               ALL address:1190344
	     1190314  if-ne v1, v2, 7
	     1190318  const/4 v1, #0
	     1190320  invoke-virtual {v0}, meth@14549
	     1190326  return v1
	               .TRY #1
	     1190328  invoke-direct {v3, v4}, meth@12236
	               .CATCH
		               ALL address:1190344
	     1190334  const/4 v1, #1
	     1190336  invoke-virtual {v0}, meth@14549
	     1190342  goto -8
	     1190344  move-exception v1
	     1190346  invoke-virtual {v0}, meth@14549
	     1190352  throw v1
All metadata is shown before .CODE, including the method’s name, return type, parameters, annotations and number of registers used in this method. The Enhanced DEX renderer condenses all this information in a Java like format.
The bytecode itself comes next. There are two columns, the instruction offset and the instruction itself. You can see some code refers to the offset directly like the .CATCH ALL blocks while other instructions use relative addressing like in goto -8. You can also see references to methods and fields by index in meth@12229 and field@4169 respectively. Resolving those references requires traversing multiple tables in the DEX file. That’s basically what the Enhanced DEX renderer does.
Enhanced DEX
This renderer tries to present the DEX instructions is a more human readable format. The first thing it does is to resolve all pointers into values. Instead of meth@12229 you will actually see the method name it points to. Same goes for all other pointers like strings and fields. Jumps are also resolved into the instructions they point to and labels are used to show the destination. Because of that the offset column is not needed in this renderer.
Another big difference is how registers are displayed. If you notice in the header of the Plain DEX example you will see .REGISTERS 5. In the code itself that translates to registers from v0 to v4 being available. You have to parse the method signature to understand one of these registers is actually being used for the single argument passed into this method. In fact the hidden argument ‘this’ is passed as an argument as well. But which registers are used for the arguments? The Enhanced DEX renderer disambiguates that for you and displays arguments as ‘aX’ and local variables as ‘vX’. It also resolves references to the hidden this argument to ‘this’.
The method signature is presented in a Java-like format, including annotations. Another Java-like change is for indexing instructions like aput v0, v1, v2 which are displayed as v1[v2] = v0.
The outcome is dramatically more readable although it is still DEX. Here is the same method, now using the Enhanced DEX renderer. Even if you are unfamiliar with DEX instructions you can probably follow the logic in this method now:
@dalvik.annotation.Signature(value=["(TE;)Z"])
public boolean offer (java.lang.Object a0) {
	java.util.concurrent.ArrayBlockingQueue.checkNotNull()
	v0 = this.lock
	v0.lock()
	try
		v1 = this.count
		v2 = this.items
		v2 = v2.length
	catch(ALL) :catch_0
	if (v1 != v2) :if_0
	v1 = #0
	v0.unlock()

	:goto_0
	return v1

	:if_0
	try
		this.enqueue(a0)
	catch(ALL) :catch_0
	v1 = #1
	v0.unlock()
	goto goto_0

	:catch_0
	move-exception v1
	v0.unlock()
	throw v1
}
Basics of DEX compilation
In this article I will discuss initialization and the fundamental control flow statements. I will use the simple Example class below to explain what happens during the compilation.
public class Example {

    public static final String LOG_TAG = "Example";
    private static int cCount = 1;
    private int mValue = 123;
    private boolean mLog;

    public static void main(String[] args) {
       Example e1 = new Example(true);
    }

    public Example(boolean shouldLog) {
            mLog = shouldLog;
    }

    private void testDo() {
      int i = 0;
      do {
         System.out.println(i);
      } while (++i < 10);
    }

    private void testWhile() {
      int i = 0;
      while (i++ < 10) {
         System.out.println(i);
      }
    }

    private void testFor() {
      for (int i=0; i<10; i++) {
         System.out.println(i);
      }
    }

    private void testIf() {
      if (mValue<10) {
         System.out.println("Small value");
      }
    }
}
Initialization
There is a surprising amount of complexity around the initialization of classes and fields. The code above shows the majority of the cases.
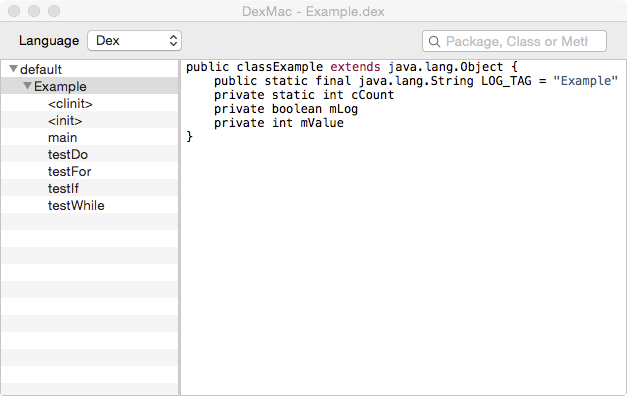 DexMac showing the Example class
First, by selecting the Example class in DexMac you see the static final field has the value assigned to it but neither cCount nor mValue do. What happened here? Without going into much details static final fields are initialized differently. Their values are kept in a separate table to allow for optimizations, i.e. other classes can refer directly to them.
Values assigned to a static field are moved into a static block. This class didn’t define one so the compiler generates one for the class. The static block is referred to as <cinit>. This is what the assignment looks like in DEX:
static constructor void <clinit> () {
	v0 = #1
	Example.cCount = v0
	return-void
}
The logic to initialize instance fields is moved directly into the constructor. Since a constructor already existed the field initialization is injected after the call to the main constructor:
public constructor void <init> (boolean a0) {
	this.<init>()
	v0 = #123
	this.mValue = v0
	this.mLog = a0
	return-void
}
Control Flow Statements
Let’s start by looking at the do statement. I want to call your attention for the fact the registers in DEX are not typed. You can see ‘v1’ is first assigned the ‘out’ PrintStream then later assiged to 10. This is perfectly valid in DEX. Registers don’t necessarily have to have a direct correlation with variables in a Java program.
private void testDo () {
	v0 = #0

	:if_0
	v1 = java.lang.System.out
	v1.println(v0)
	v0 = v0 + #1
	v1 = #10
	if (v0 < v1) :if_0
	return-void
}
Just like in the Java code a variable is initialized to 0 before the loop. The following 2 lines are the print statement. At this level the first thing to do is to retrieve the PrintStream from java.lang.System and assign it to a register. Once a register is holding the reference to the target class or object methods can be invoked, in this case println. The next two lines set the values for the expression in the while statement. The while statement is a simple conditional jump back to the top of the loop.
Let’s look at the while loop next since it’s a very similar construct.
private void testWhile () {
	v0 = #0

	:goto_0
	v1 = v0 + #1
	v2 = #10
	if (v0 >= v2) :if_0
	v0 = java.lang.System.out
	v0.println(v1)
	v0 = v1
	goto goto_0

	:if_0
	return-void
}
Matching the logic in the Java program the expression evaluation is now at the top of the loop and the conditional jump (if instruction) is used to break the loop. The loop is closed with the unconditional jump using the goto instruction.
The for loop looks very similar to a while. In fact it is a bit hard to distinguish between the two by just looking at the DEX instructions.
private void testFor () {
	v0 = #0

	:goto_0
	v1 = #10
	if (v0 >= v1) :if_0
	v1 = java.lang.System.out
	v1.println(v0)
	v0 = v0 + #1
	goto goto_0

	:if_0
	return-void
}
Finally we can look at the if statement. It should feel a little familiar at this point. You can see there will be no jump if the condition in the statement is true.
private void testIf () {
	v0 = this.mValue
	v1 = #10
	if (v0 >= v1) :if_0
	v0 = java.lang.System.out
	v1 = "Small value"
	v0.println(v1)

	:if_0
	return-void
}
Android reverse engineering tools
Links to the tools introduced in this article
- DexMac - Cocoa App
- DexDisassembler - Linux GTK App
- Dedex is a command line tool
These are tools I came across while working with APKs/DEX
- dexdump - part of the Android SDK
- baksmali - Does round-trip disassembly and assembly allowing for changes to the disassembled files
- apktool - Converts entire APKs to a human readable format. Uses backsmali for classes.dex
- Dare - Converts .dex to a set of .class files
- dex2jar - Similar to Dare
- Androguard - Python libraries and tools to manipulate APKs
- apk2gold - If you are interested in reading Java code from APKs
